Mosaic Jiggle Tag
by Deb Hoge
June 2006
This tutorial was made in PSP9 but can be used for all versions 7 and up.
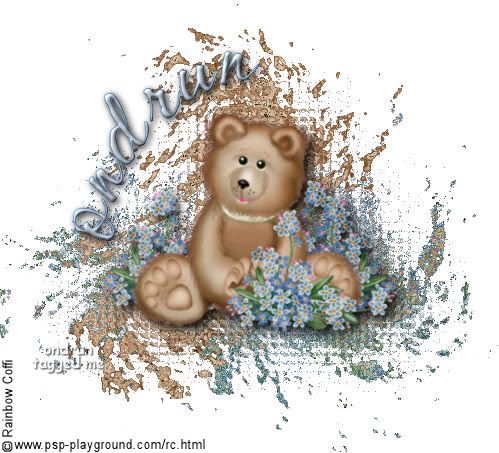
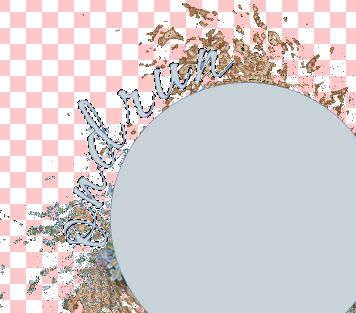
Here is an example of what we will be making
by Deb Hoge
June 2006
This tutorial was made in PSP9 but can be used for all versions 7 and up.
Here is an example of what we will be making
You will need
Paint Shop Pro
You can download a fully functional 30 day trial version at the Corel site.
Paint Engine
This filter is free but is no longer offered at the Fantastic Machines site.
It can be found here
Fantastic Machines has a Beta version out which I have not tried which can be found here
Eye Candy 4000
This is a commercial filter and can no longer be found at the site.
I have contacted the company to find out what to do.
I am currently going to test Eye Candy 6 to see if it is anything like it, but I doubt it. You can down load ithere
Eye Candy 3 has always been a free version
It is no longer offered at the Alien Skin website.
It can be downloaded from here
The tube I am using is by Rainbow Coffi
She has graciously allowed me to use her tube for this tutorial.
You can obtain her tube here
The font I am using is CAC Shishoni Brush
It is a free font and can be found here
The first thing you need to do is duplicate the original image. You do this by pushing shift then D. Then close your original image so that it remains in it's original state.
1. Open up a new 500 x 500 pixel transparent image.
2. Go to your tube. If you are using Rainbow Coffi's Forget me not bear resize it by 85%. Notice there are 2 layers on this tube
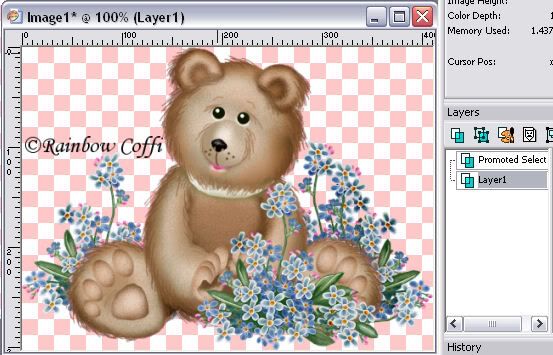
The Promoted Selection is the layer which holds the copyright information.
The Layer1 is the layer with the tube of the bear.
Make sure you are on the Layer1
Then go to edit, copy.
Go to the blank new 500 x 500 image, make it active. Then go to edit, paste, paste as new layer.
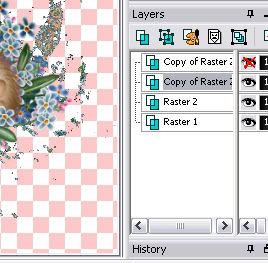
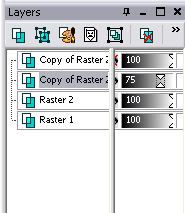
3. You should now be on Raster 2. Right click on the highlighted layer in the layer palette and there will be a menu box pop up, choose duplicate.
Activate Raster 2 again and duplicate it again.
Now you should have a total of 4 layers
The Layer1 is the layer with the tube of the bear.
Make sure you are on the Layer1
Then go to edit, copy.
Go to the blank new 500 x 500 image, make it active. Then go to edit, paste, paste as new layer.
3. You should now be on Raster 2. Right click on the highlighted layer in the layer palette and there will be a menu box pop up, choose duplicate.
Activate Raster 2 again and duplicate it again.
Now you should have a total of 4 layers
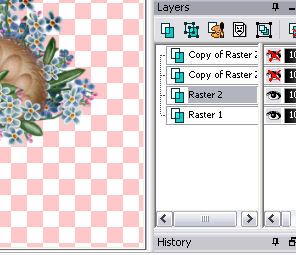
4. Activate Raster 2 again and then x out the 2 Copy of Raster 2 layers as shown above.
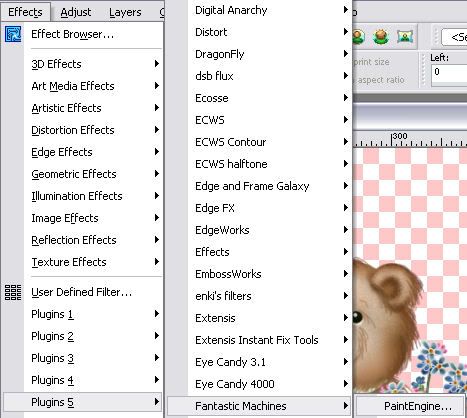
5. On this layer go to Effects, plugins, Fantastic Machines, Paint Engine
5. On this layer go to Effects, plugins, Fantastic Machines, Paint Engine
A new window will pop up
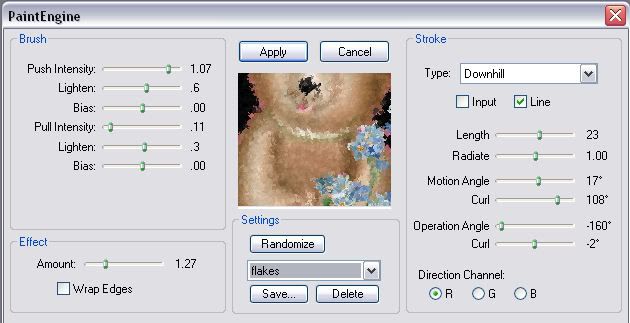
Under settings choose the flakes preset. If there isn't a flakes preset, that is okay. Just adjust the values on the levels to match the screen shot above and that will be the same as the flakes preset. If you like it, you can save it as flakes and you will have it the next time you need the preset flakes.
Choose the apply button
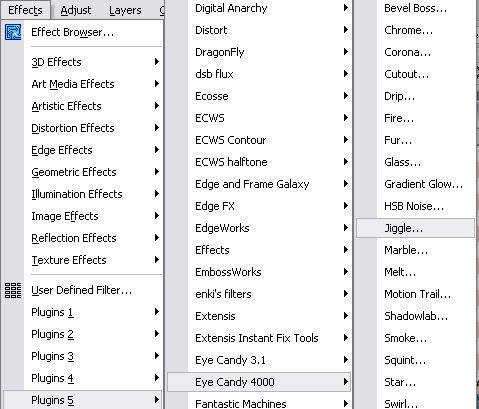
6. Go to Effects, plugins, Eye Candy 4000 if you have it, or Eye Candy 3 if you are using this version. Choose Jiggle for either of them. There will be slightly different results.
Choose the apply button
6. Go to Effects, plugins, Eye Candy 4000 if you have it, or Eye Candy 3 if you are using this version. Choose Jiggle for either of them. There will be slightly different results.
a new window will pop up
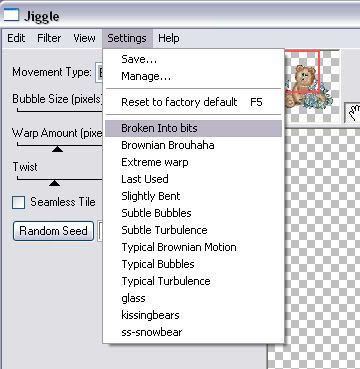
For Eye Candy 4000 go to settings and choose Broken Into bits
This isn't an option in Eye Candy 3
For Eye Candy 4000 choose Brownian Motion
The other values should be the same once these options are choosen, but go ahead and check them to make sure, then choose ok when you are done adjusting the settings.
The other values should be the same once these options are choosen, but go ahead and check them to make sure, then choose ok when you are done adjusting the settings.
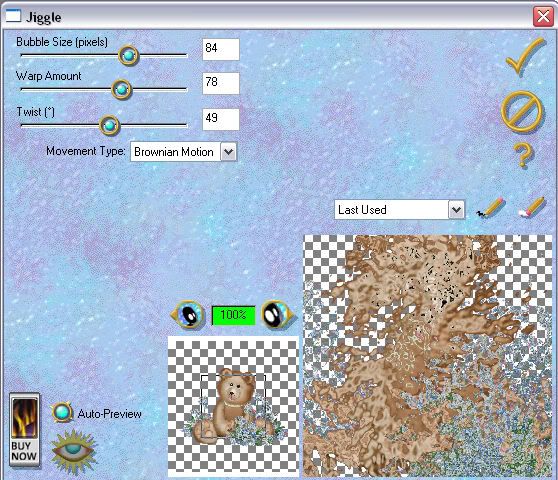
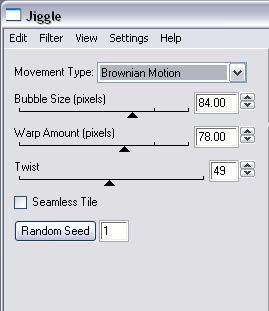
For Eye Candy 3 choose Brownian Motion
You will have to change the values of the bubbles, warp and twist to match the above values, they are not defaulted to this. Then when these are set, click on the check mark.
7. Activate your middle layer, the bottom "Copy of Raster 2 layer" and un x it so you will be able to work with it.
You will have to change the values of the bubbles, warp and twist to match the above values, they are not defaulted to this. Then when these are set, click on the check mark.
7. Activate your middle layer, the bottom "Copy of Raster 2 layer" and un x it so you will be able to work with it.
8. Resize this layer by 85%
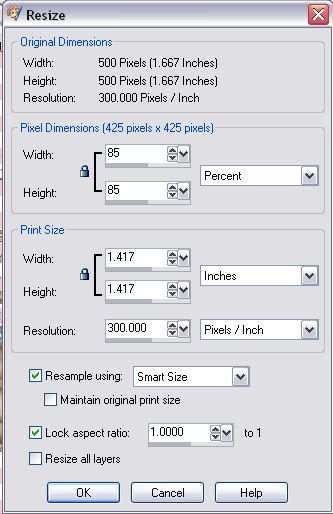
Making sure to uncheck the Resize all layers option
Click the ok button.
9. Go to Effects, Texture effects, Mosaic Glass
Click the ok button.
9. Go to Effects, Texture effects, Mosaic Glass
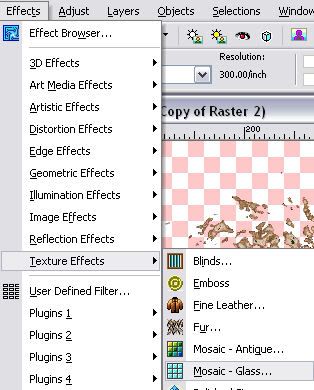
a new window will pop up
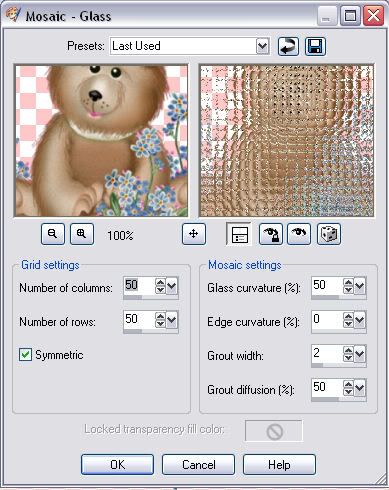
Choose the settings as above
Number of columns 50
Number of rows 50
Glass curvature 50
Edge curvature 0
Grout width 2
Grout diffusion 50
Click the ok button
Go to the layer palette and on this same layer lower the opacity to 75%
Number of columns 50
Number of rows 50
Glass curvature 50
Edge curvature 0
Grout width 2
Grout diffusion 50
Click the ok button
Go to the layer palette and on this same layer lower the opacity to 75%
11. Resize this top layer by 85% making sure to uncheck the Resize all layers option
Click the ok button.
Then resize this layer by 85% again.
Go to Effects, 3D effects, Drop Shadow
Click the ok button.
Then resize this layer by 85% again.
Go to Effects, 3D effects, Drop Shadow
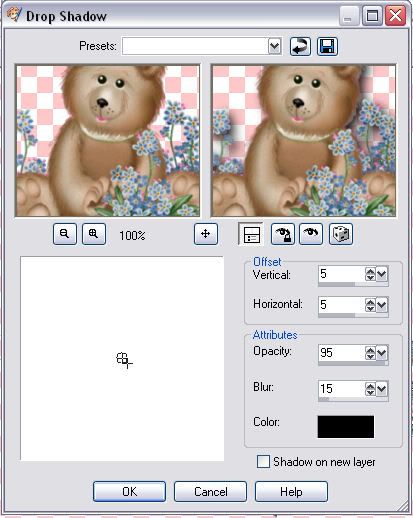
Vertical 5
Horizontal 5
Opacity 95
Blur 15
Color Black
Horizontal 5
Opacity 95
Blur 15
Color Black
Click the ok button
12. Now we are going to work on putting your name on the tag
Go to your preset shapes tool and choose your circle shape. I found it easier for this one not to use your elipse, but use your circle.
Draw out a circle to cover your image and big enough for your name.
Go to your preset shapes tool and choose your circle shape. I found it easier for this one not to use your elipse, but use your circle.
Draw out a circle to cover your image and big enough for your name.
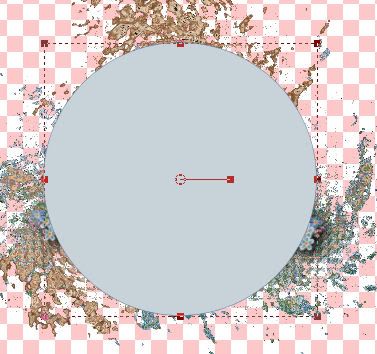
13. Now choose your text tool.
The settings I used are as follows on the tool options palette
The settings I used are as follows on the tool options palette

The colors I used are as follows:
foreground - #5679a1 (the dark option)
background - #c8d3d9 (the light option)
I used CAC Shishoni Brush, but you can use any font you would like.
foreground - #5679a1 (the dark option)
background - #c8d3d9 (the light option)
I used CAC Shishoni Brush, but you can use any font you would like.
14. Since I put my name on the side off center I hovered my tool/curser over the center of where I wanted my text
Wait until you see the half moon under the A and then click and write your name.
Now... if this isn't where you want it you can use your mover tool and move it up, down or over and it will move it on the curve.
Wait until you see the half moon under the A and then click and write your name.
Now... if this isn't where you want it you can use your mover tool and move it up, down or over and it will move it on the curve.
15. While the text is still selected go to Effects, 3D Effects, Inner bevel
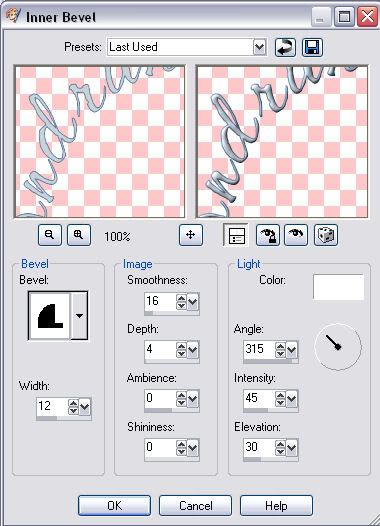
Bevel #11
Width 12
Smoothness 16
Depth 4
Ambience 0
Shininess 0
Color White
Angle 315
Intensity 45
Elevation 30
Width 12
Smoothness 16
Depth 4
Ambience 0
Shininess 0
Color White
Angle 315
Intensity 45
Elevation 30
Choose ok
16. Go to effects, 3D effects, Drop Shadow
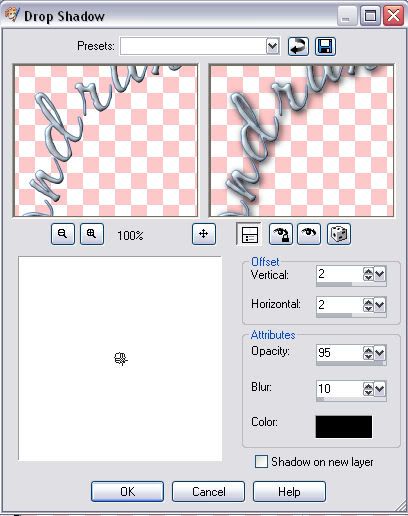
Vertical 2
Horizontal 2
Opacity 95
Blur 10
Color black
Horizontal 2
Opacity 95
Blur 10
Color black
Choose ok
17. Delete the vector layer in the layer palette
18. Since this image was drawn by Rainbow Coffi, her copyright information is put into the corner at this time with her website information also.
You can also add your tagger information at this point.
You can also add your tagger information at this point.
19. Go to layers, merge, merge all (visable)
21. Save image as a png and you are done!
You will notice my original image is saved on a white background and saved as a jpg. When I orginally wrote this tutorial, that was the way to do things. Things have changed and this tutorial has been updated. If you would still like to add a white background and save it as a jpg, you may do so.